redux源码实现
redux 简介
redux是一个集中管理 JS 应用状态的容器,是函数式编程在 js 中的一个典型应用。
3 个核心概念
- Store: 数据状态管理中心
- Actions: 当数据需要变化时,通过派发 actions 通知 store
- Reducers: 用于通过 actions 来生成新数据状态的纯函数
主要工作流程
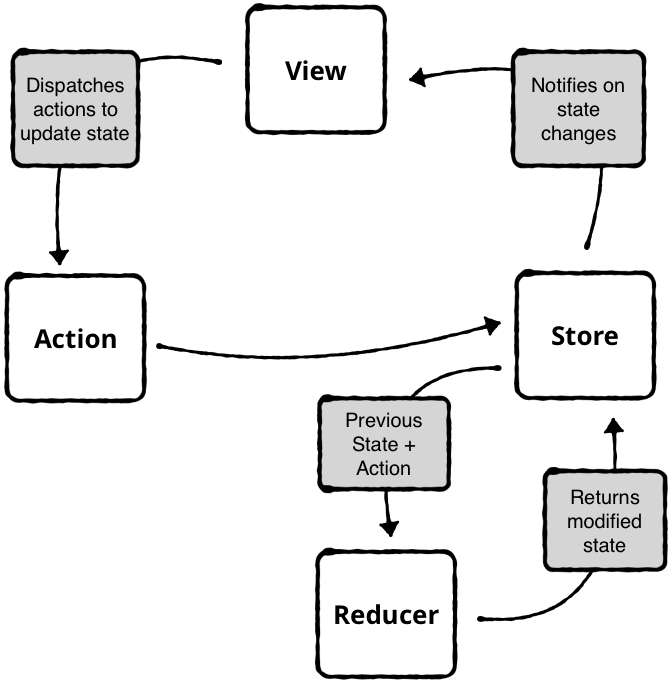
这里有一份关于 redux 的流程图

- 全局生成一个唯一的 store,其中记录了初始化的 state。
- store 里面注册一些监听器,当 store 中的 state 发生变化时,自动调用监听器中回调函数。监听器主要是一些 View 相关的监听器,当 state 变化时自动更新视图。
- 当 store 中的 state 需要改变时,不能直接修改 state,而是通过生成 actions 来派发给 store。
- store 将当前的 state 以及 actions 作为参数传递给 reducer,reducer 根据 state 和 actions 生成新的 state,并替换 store 中的原始 state。
- store 感知到 state 变化以后,自动调用监听器中的回调函数(如果是 view 会触发视图的一些更新)。
- 循环 3-6 的工作流程。
优点
- reducer 都是纯函数,容易 debug。
- 由于 state 改变只能通过派发 actions 来进行改变,所以很容易的监测、记录 state 的变化。这就使得可以实现一些 state 的数据回溯、数据穿 g 等等。
- 发布订阅模式,简单、高效易于扩展。
实现 redux
1. 实现发布订阅模式
发布订阅模式
发布订阅模式又叫做观察者模式,是一种一(发布者)对多(订阅者)的关系。订阅者会在发布者上面订阅特定的事件,当特定事件触发时,发布者会自动通知所有该事件的订阅者。
熟悉dom 操作前端 ers 都应该使用过document.addEventListener('onclick', function)这类的操作,这就是发布订阅模式的一个实现。其中document是发布者,onclick是订阅事件, function是订阅者。
这里我们实现一个生成发布者的函数createStore, 它内部通过listeners数组来保存订阅函数,并且暴露subscribe方法来让外部添加监听器。
const createStore = function (initStates) {
  let state = initStates
  const listeners = []

  // 订阅方法
  const subscribe = function (listener) {
    listeners.push(listener)
  }

  // 改变state的方法, 改变state后自动触发监听器
  function changeState(newState) {
    state = newState
    for (let listener of listeners) {
      listener()
    }
  }
  // 获取state的方法
  function getState() {
    return state
  }

  return {
    getState,
    subscribe,
    changeState,
  }
}
然后我们编写一个 Demo 来更好的理解这个模型
let initState = {
counter: {
count: 0,
},
info: {
name: '',
description: '',
},
}
// 使用demo
const store = createStore(initState)
store.subscribe(() => {
let state = store.getState()
console.log(state.info.name)
})
store.changeState({
...store.getState(),
info: {
name: 'Jaluik',
description: '前端👨🏻💻',
},
})
// 此时会打印Jaluik
let newInitState = {
count: 0,
}
let newStore = createStore(newInitState)
newStore.subscribe(() => {
let state = newStore.getState()
console.log(state.count)
})
newStore.changeState({
count: newStore.getState().count + 1,
})
//打印1
newStore.changeState({
count: newStore.getState().count - 1,
})
//打印0
newStore.changeState({
count: 'abc',
})
// 打印abc
模型总结
这是一个发布订阅模型的基本框架: 先注册订阅回调函数,然后状态更新时自动触发回调函数。
接下来我们需要改进这个模型,使得state的改变更加具备可控性。
2. 派发actions来改变state
这一步我们想要更加细力度的控制
state的改变
对于上一节的createStore函数,我们需要做两个调整。
- 增加
plan函数作为第一个入参。 之所以命名为plan是因为这个函数是用于以后 state 状态改变时调用的,相当于在为以后做计划。 - 每次调用changeState 函数时,参数不再是
state,而是传递action。action的类型类似于 redux 的action
这是调整后的createStore函数
const createStore = function (plan, initState) {
  let state = initState
  const listeners = []

  function subscribe(listener) {
    listeners.push(listener)
  }

  // 注意这里changeState的参数是action
  // plan的参数时当前的state和action
  function changeState(action) {
    const newState = plan(state, action)
    state = newState
    for (let listener of listeners) {
      listener()
    }
  }

  function getState() {
    return state
  }
  return {
    getState,
    changeState,
    subscribe,
  }
}
下面演示新版本的createStore如何使用
const initState = {
  count: 3,
}

function plan(state, action) {
  switch (action.type) {
    case 'INCREMENT':
      return {
        ...state,
        count: state.count + 1,
      }
    case 'DECREMENT': {
      return {
        ...state,
        count: state.count - 1,
      }
    }
    default:
      return state
  }
}

const store = createStore(plan, initState)

store.subscribe(() => {
  console.log(store.getState())
})
store.changeState({ type: 'INCREMENT' }) // 4
store.changeState({ type: 'INCREMENT' }) // 5
store.changeState({ type: 'INCREMENT' }) // 6
模型总结
这个模式是不是有redux雏形那味儿了?
但是这个模式有一个缺点: 如果 state 里面不只有一个count属性,而是有很多个属性的话,那每种属性我都要switch一个条件判断,然后再更改,那么plan这个函数就会越来越大,最后难以维护。
所以,我们下一步要拆分plan函数。
3. 拆分 reducer
这里我们把
plan函数重新命名为reducer(当然,它就是 redux 中的 reducer)。reducer 命名的灵感据说来源于js中的[].reduce(function reducer(){}, initState)。到后面你会发现我们的reducer和 js 中 reduce 的第一个参数有异曲同工之妙。
我们需要对之前的模型做一些调整
- 不需要调整
createStore函数 - 重新组织
reducer的样式 - 增加
combineReducers函数, 可以把多个 reducer 合并为一个大的 reducer。 - 把 changeState 函数更名为dispatch函数
//这个函数的作用在于遍历reducers对象,通过遍历每一个key值来生成一个新的reducer。
//注意这里面我们约定state的key和reducer的key是一样的。
function combineReducers(reducers) {
  const reducerKeys = Object.keys(reducers)
  const nextState = {}
  return function combination(state = {}, action) {
    for (let key of reducerKeys) {
      const reducer = reducers[key]
      const previousStateForKey = state[key]
      const nextStateForKey = reducer(previousStateForKey, action)
      nextState[key] = nextStateForKey
    }
    return nextState
  }
}

//这是合并后的reducer
const reducer = combineReducers({
  key1: reducer1,
  key2: reducer2,
})
使用方法可以配合下面的示例
const initState = {
  counter: {
    count: 0,
  },
  info: {
    name: 'jaluik',
    description: '热爱前端的人',
  },
}

function counterReducer(state, action) {
  switch (action.type) {
    case 'INCREMENT':
      return {
        ...state,
        count: state.count + 1,
      }
    case 'DECREMENT': {
      return {
        ...state,
        count: state.count - 1,
      }
    }
    default:
      return state
  }
}

function infoReducer(state, action) {
  switch (action.type) {
    case 'SET_NAME':
      return {
        ...state,
        name: action.name,
      }
    case 'SET_DESCRIPTION':
      return {
        ...state,
        description: action.description,
      }
    default:
      return state
  }
}

// 注意这里我们让它们的key值和state的key值保持了一致。
const reducer = combineReducers({
  counter: counterReducer,
  info: infoReducer,
})

const store = createStore(reducer, initState)

store.subscribe(() => {
  console.log(`${store.getState().counter.count}`)
})
store.subscribe(() => {
  console.log(
    `${store.getState().info.name}---${store.getState().info.description}`
  )
})

store.dispatch({
  type: 'INCREMENT',
})
store.dispatch({
  type: 'DECREMENT',
})
store.dispatch({
  type: 'SET_NAME',
  name: '祁佚',
})
store.dispatch({
  type: 'SET_DESCRIPTION',
  description: '而且热爱后端',
})
store.dispatch({
  type: 'INCREMENT',
})
模型总结
这里我们已经拆分了reducer的逻辑,把一个巨大的reducer拆分成了许多个小的模块,每个模块具有一个 key 值。
接下来我们来实现中间件(applyMiddleware)
4. 增加 middleware 中间件
redux 的中间件提供了让外部程序能够接触和改写内部 state 和 action 的能力。
比如我们想要能够记录 action 和 state 的日志,我们只需要在派发action的过程中,添加记录日志的代码
let next = store.dispatch
store.dispatch = function dispatchAndLog(action) {
  console.log('dispatching', action)
  next(action)
  console.log('next state', store.getState())
}
这里重写了dispatch函数,这就是中间的作用。
首先,在写中间件之前,为了我们的例子和 redux 的用法保持一致,这里我们做一个细微的改动
- 调用 createStore 触发一次内部的dispatch
完整的代码如下
function createStore(reducer, initState) {
  let state = initState
  let listeners = []

  function subscribe(listener) {
    listeners.push(listener)
  }

  function getState() {
    return state
  }
  function dispatch(action) {
    state = reducer(state, action)
    for (let listener of listeners) {
      listener()
    }
  }
  // 用于传递初始化的值, 因为每个reducer内部需要定义一个初始化值
  dispatch({ type: Symbol() })

  return {
    getState,
    dispatch,
    subscribe,
  }
}
实际使用过程中,每一个 middleware 都是一个高阶函数,依次接收 store => 下一个 middleware,并最后返回一个 dispatch 函数。store 和 middleware 参数由我们写的applyMiddleware来自动注入参数
接下来我们定义 applyMiddleware 函数
// 主要作用是应用多个中间件,然后改变原来的dispatch函数
const applyMiddleware = function (...middlewares) {
  return function rewriteCreateStoreFunc(oldcreateStore) {
    return function (reducer, initstate) {
      const store = oldcreateStore(reducer, initstate)
      const chain = middlewares.map((middleware) => middleware(store))
      let dispatch = store.dispatch
      // 这里有一个逆序的过程
      chain.reverse().map((middleware) => {
        dispatch = middleware(dispatch)
      })
      store.dispatch = dispatch
      return store
    }
  }
}
最后来看一下如何使用applyMiddleware
const finalCreateMiddleware = (reducer, initState, rewriteCreateStoreFunc) => {
  if (rewriteCreateStoreFunc) {
    const newCreateStore = rewriteCreateStoreFunc(createStore)
    return newCreateStore(reducer, initState)
  }
  return createStore(reducer, initState)
}

// 最终用法
const exceptionMiddleware = (store) => (next) => (action) => {
  try {
    next(action)
    console.log('错误报告中间件')
  } catch (err) {
    console.log('错误报告: ', err)
  }
}
const timeMiddleware = (store) => (next) => (action) => {
  console.log('time', new Date().getTime())
  next(action)
}

const rewriteCreateStoreFunc = applyMiddleware(
  exceptionMiddleware,
  timeMiddleware
)
const store = finalCreateMiddleware(
  counterReducer,
  initState,
  rewriteCreateStoreFunc
)
store.subscribe(() => {
  console.log(store.getState())
})

store.dispatch({ type: 'INCREMENT' })
store.dispatch({ type: 'INCREMENT' })
store.dispatch({ type: 'INCREMENT' })
store.dispatch({ type: 'INCREMENT' })
完结~